Cattura schermate su Android
A causa di limitazioni di sicurezza, le app Android non possono accedere direttamente alla funzione di cattura schermo su dispositivi Android non rooted. Qualche dispositivo include un pulsante extra (  ) sulla barra di navigazione che permette agli utenti di catturare schermate ma la maggior parte richiede di premere due pulsanti hardware contemporaneamente.
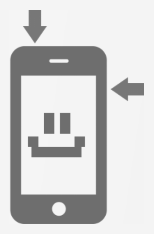
Nel caso in cui il tuo dispositivo non includesse un tasto virtuale per la cattura schermate, molto probabilmente dovrai utilizzare una delle combinazioni di tasti che seguono. Android fornisce poi un riscontro sia visivo che audio alla cattura di una schermata.
- • Accensione + Volume basso
- • Accensione + Menu
- • Accensione + Home
Per il funzionamento dell'app, devi disattivare il gesto per il clic per creare schermate nelle tue impostazioni di sistema.
Apertura e salvataggio schermate e immagini
Per impostazione predefinita, Droid Screenshot verrà lanciato automaticamente ogni volta che si crea una nuova schermata. Per farlo, Droid Screenshot utilizza un servizio in background che controlla la cartella predefinita delle schermate sul tuo dispositivo. Per aprire manualmente schermate esistenti e immagini, tocca l'icona  e seleziona la tua scelta risorse immagini preferita come Gallery. Puoi anche toccare l'icona
  per scattare una foto con la fotocamera incorporata nel tuo dispositivo. Nota che Droid Screenshot all'avvio caricherà sempre l'immagine precedentemente modificata.
Ogni volta che Droid Screenshot viene chiuso o una nuova immagine viene caricata, l'immagine attuale viene automaticamente salvata. Puoi comunque salvare manualmente le immagini in una diversa posizione o sotto un nome file diverso tramite "Salva con nome..." posto nel menu contestuale. Per impostazione predefinita, le immagini verranno salvate nella cartella "Ashampoo Snap" sulla scheda SD interna del dispositivo.
Operazioni con l'area di lavoro
Quando è selezionato lo strumento mano, puoi trascinare per scorrere e pizzicare per ingrandire. Nota pure il rettangolo blu di selezione intorno all'area di lavoro. Per ridimensionarla puoi trascinarne i bordi.
Operazioni con gli strumenti di modifica
Selezione strumenti di modifica e passaggio dall'uno all'altro
Tocca l'icona  per visualizzare/nascondere la barra strumenti di modifica e seleziona il tuo strumento desiderato. Lo strumento attualmente selezionato viene visualizzato accanto al pulsante di attivazione della barra strumenti di modifica. Per passare rapidamente tra lo strumento attualmente selezionato e la funzione di trascinamento/scorrimento tocca l'icona
  posta in basso a destra.
Utilizzo degli strumenti di modifica
Selezione dei colori e degli stili di linea
Ad eccezione dei bollini, tutti gli strumenti ti consentono di applicare diversi colori e stili di linea. Per accedere a queste impostazioni, tocca lo strumento attualmente selezionato visualizzato accanto al pulsante di attivazione della barra strumenti di modifica. Così aprirai la finestra delle impostazioni colori/linee.
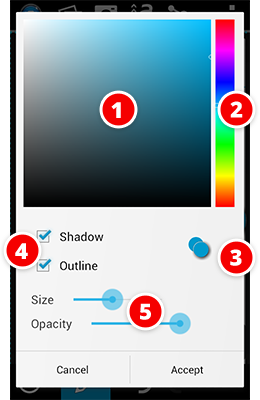
Per selezionare un colore, tocca il gradiente di colore nel centro (1). Puoi regolare il suo spettro toccando lo spettro colori sulla destra (2). Entrambi i colori selezionati precedente e attuale vengono visualizzati sotto i gradienti (3). Puoi anche applicare un effetto ombra e/o contorno a tutti gli strumenti che li supportano (4) e regolare l'opacità e lo spessore del tratto (5).
Rotazione e ridimensionamento oggetti
Per ruotare gli oggetti selezionati, mantieni un dito sullo schermo e spostane un altro con un movimento circolare come con un compasso. Usa il gesto dei pizzicotti per ridimensionare gli oggetti. Con alcuni oggetti come le forme, pizzicando si modificheranno gli spessori delle loro linee.
Condivisione immagini
Tocca l'icona  per accedere alle opzioni di condivisione. Droid Screenshot funziona con tutti i servi di file installati (online).
Caricamento sullo spazio web Ashampoo PRO
Lo spazio web Ashampoo ti permette di condividere le immagini attraverso univoci collegamenti Internet e rende le tue immagini accessibili tramite qualsiasi browser web. Le tue immagini verranno rimosse automaticamente dopo 30 giorni quindi non devi preoccuparti che stiano online per sempre. Una volta caricate, Droid Screenshot visualizzerà una notifica, copia il collegamento negli Appunti di sistema e consenti di condividere il collegamento subito attraverso tutti i servizi di file installati (online).
Regolazione impostazioni app
Tocca  per accedere al menu contestuale e seleziona "Impostazioni".
| Nome |
Descrizione |
| Formato di salvataggio |
Droid Screenshot può memorizzare le immagini in formato JPG o PNG. PNG è un formato senza perdite che manterrà la qualità originale delle immagini, ma può richiedere più spazio sul tuo dispositivo. JPG supporta la compressione dell'immagine e ti permetterà di regolare la qualità dell'immagine. Un'impostazione superiore significa meno compressione, più qualità e richiede più spazio. |
| Mostra lo stato nell'area di notifica |
Se abilitato, viene visualizzato lo stato corrente dell'app nell'area di notifica. Si può poi utilizzare questo stato per accedere rapidamente all'app. |
| Invio dati di utilizzo |
Se abilitato, avverrà l'invio anonimo ad Ashampoo dei dati di utilizzo dell'app (quali pulsanti sono stati utilizzati e quanto spesso, ecc.) per aiutarci a migliorare l'applicazione, ad es. ottimizzando l'interfaccia utente sulla base di comuni abitudini dell'utente. |
| Acquisisci schermate |
Se abilitato, Droid Screenshot utilizzerà un servizio in background per monitorare la posizione delle schermate selezionate per tutte le nuove immagini e per aprirle automaticamente. |
| Posizione di sistema delle schermate |
Sulla maggior parte dei dispositivi, Droid Screenshot determina automaticamente la posizione predefinita per le schermate quando si è creata una schermata. In qualche raro caso, saranno gli utenti a dover specificare manualmente la cartella utilizzata dal sistema per memorizzare le schermate. Nota che se si seleziona manualmente una cartella non usata come predefinita dal dispositivo, l'auto-acquisizione non funzionerà più. Gli utenti inesperti dovrebbero lasciare intatta questa impostazione. |
| Cartella salvataggi |
Questa posizione è utilizzata per i salvataggi manuali. Gli utenti inesperti dovrebbero lasciare intatta questa impostazione. |
Problemi comuni
Sebbene Droid Screenshot sia stato rigorosamente testato, possono sorgere problemi non previsti dai nostri sviluppatori. Se dovessi incontrare un problema non elencato, non esitare a contattare il nostro servizio clienti a support@ashampoo.com. Tocca "Guida" > "Invia mail" per contattarci direttamente tramite Droid Screenshot.
Mi è impossibile creare una schermata
Assicurati che il tuo dispositivo supporti la creazione di schermate e vi sia spazio sufficiente. Vedi Cattura di schermate su Android per i dettagli su come creare schermate.
In Droid Screenshot le schermate non si aprono automaticamente
Per far in modo che Droid Screenshot apra automaticamente nuove schermate, "Acquisisci schermate" deve essere abilitato nelle impostazioni dell'app e Droid Screenshot monitorerà la cartella schermate specificata nelle impostazioni. Vedi impostazioni delle regolazione dell'app per dettagli.